Directions for brocade clay:
pkg of polymer clay, I used black
3-4 colors of paint, I used luminaire but you could use any good acrylic paint, the more pigment the better.
pasta machine is best but you cn use a roller and roll the clay by hand.
Tefflon pad or parchment paper
cookie cutters used only for clay
paint brushes
polymer glaze
liquid polymer
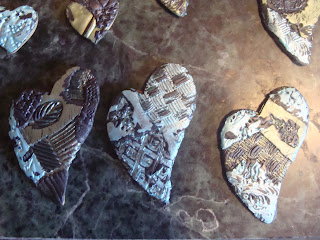
example of brocade hearts
pearl ex powder, I used pearl color
unmounted rubber stamps, I used a sheet from color box for the stylus
pin
rubber brayer or roller
Directions:
Gather all your supplies together
Prepare your clay and condition it by rolling it thru the pasta machine about 20 times. If you don't have a pasta machine work it by kneading it with your hands till soft and pliable.
When it is soft, separate it into 3 separate pieces and roll on the largest setting into 3 flat sheets.
Use a paint brush and cover your clay with a light layer of paint. Let this dry for 10 min and add another layer of paint, repeat adding paint for 4-5 layers. Paint all 3 sheets of clay with a different color for each sheet. You can add more than 1 color on a sheet if you wish. After last layer is added, let dry completely.
In the meantime add a layer of pearl ex to your stamp with a large paint brush, tap off the extra, you can also use cornstarch or talcum powder if you desire, I myself like the sheen of the pearl ex.
Lay your clay on the sheet at the very bottom and place into the pasta machine with the clay on the bottom and the stamp on the top, and adjust the machine to the next thickness. Roll this thu the machine. You will come out with the stamp image stamped deeply into the clay forming a brocade sheet.
Use your cookie cutters and cut shapes out of your brocade sheet,

You can cut lots of embelishments out of a sheet,
If your emblishments are too thin you can mount the brocade sheet onto a solid image of the same. To do this, repeat steps above to condition clay, do not add paintbut roll a solid sheet on the thickest setting, and cut out duplicate images, see fig 8.
Paint a little bit of liquid polymer on the plain image and lay the brocade sheet on top and lightly roll with rubber brayer. See fig #9, and 9B , smooth the edges with your finger, and use pin or dowell to punch a hole in for hanging.

Place on a bakable surface, I used a piece of marble and bake in a preheated oven according to pkg directions. When cool, brush with a layer of polymer glaze.
Below are some finished pieces, I hope you enjoythisfun technique....Linda

I created this pendant to go with this shirt for my dear friend MC Stoy as turquoise is her favorite color.


2 comments:
Wow! Your polymer brocades turned out gorgeous!! I love the designs you used for stamping in your clay. Beautifully done!! I must get myself a pasta machine :D
These are gorgeous Linda, I really enjoyed checking out your lovely collection of art. Thanks,
Rob K.
Post a Comment